Posts Tagged ‘Buoyancy’
 Okay, I’ve been a bad boy. It was more than a year ago I said I would update the post with the instructions. You guys didn’t call me on it, so I forgot. The original post is here along with a pdf of the plans I had printed for myself:
Original Tissue Paper Hot Air Balloon Post
The original plans make a balloon that is 60 inches high. That is perfect for the classroom, it takes three pieces of tissue paper per panel and you need six panels. You will find I went big on this one and made a 90 inch version for myself. It is rather unwieldy and difficult to handle, but bigger balloon means bigger lift. At this point, I can put one of these 60″ balloon together in about an hour, where it takes the kids at least 2 hours.
One of the challenges we ran into was finding the aluminum wire we used to keep the mouth open. You want this for two important reasons; first, to add ballast; but more importantly, without it, the kids can’t catch the balloons on their heads. I found the wire at Dick Blick, an art supply store. They list it under sculpture wire, we use the 14 gauge wire. It costs $16 for a 350 foot spool. Each balloon uses about 3 feet. That’s a lot of hot air balloons.
When it is too windy outside, we tend to launch these in the gym. I have two heat sources. The indoor one is a heat gun I purchased from Harbor Freight on sale for $10. It works great, I make sure I handle it so nobody gets burned. The outside source is a plumbers propane torch. Nobody handles that but me, I don’t need to write up any (more) accident reports. If you are using the torch, make sure the kids keep the balloon opened up, if you aren’t careful you can catch the balloon on fire. Oops, only did that once, very cool though. If you do that, light it from the bottom, it goes up into the air and disintegrates … poof. Bad science teacher.
Some day I may make one of those cool chimney launchers, but then I’ll have to store it in my room. It’s already looking like Sanford and Sons in my classroom, I don’t know how much more junk I can store.
Today my Physical Science classes did two short labs in one period. Both of these mini-labs came from the book “Super Science with Simple Stuff!” by Susan Popelka. The book is geared towards middle school, but that never bothers me.
The first was using air pressure to crush a soda can. I was going to do this as a demonstration, but when I tried it this morning, the impact of the event was so powerful, I decided to have the kids do it themselves.
What you do is take a soda can and put about 1/4″ of water in it. Heat the can over a bunsen burner until the water is boiling. If you have a triangle support on a ring stand, it takes about one minute. If you have an asbestos wire mesh, it takes a couple more minutes. When the water in the can is boiling, use tongs and invert the can into a bowl of water. The can implodes instantly and dramatically. I’m a jaded science geek and it impressed me. The kids absolutely loved it. I had extra cans so they could do it again, they used up all my cans in both my classes.
The second lab uses Corn Syrup, Water, Vegetable Oil, and Rubbing Alcohol. I used a 250ml beaker and had them put 50ml of each liquid. First the corn syrup, then the water. Before adding the water, they added a drop of blue food coloring. Next they added the oil, but poured it over the back of a spoon so it would cause the layers to mix. Last the alcohol with a drop of red food coloring, again poured in over the back of a spoon. You get four very distinct layers. Then use random items to see if they float in between the layers. I used wooden toothpicks, bits of a plastic spoon, beans, and bits of Styrofoam from a cup.
The kids all commented how cool the lab was today. They enjoyed it and were really excited.
Tissue Paper Hot Air Balloon
Posted on: June 15, 2008
- In: Activities | Outdoor | Physical Science
- 22 Comments
This is a really enjoyable projects for the students. I’ve done this with kids from 7th grade to 12th grade and always with positive results. Allow two days for the building of these balloons. Use the template design to make a full size template. Even better, make several templates, it will make the project go much faster and smoother.
 The hot air balloons are almost five feet tall when they are completed. If the students put a little thought into the design, they turn out really colorful. I do this activity when I’m discussing buoyancy. The temperature differential between the air inside the balloon and outside the balloon causes a density difference. The inside air expands due to the heat and becomes less dense. Just like in any liquid, an object less dense than the surrounding medium will float. One of the key points is that air is a medium just like water and that is why the balloon floats. This is not a good activity to do on a hot fall or spring day, a cold, still day is best. If I am in the gym, I use an electric heat gun to generate the hot air. If I go out to the fields (which is way more fun), I take a propane torch and VERY carefully heat the air inside the balloon. Last year I caught one of the balloons on fire. It took off into the sky and burned at the same time. There was nothing left in only a few short seconds.
I used to get the tissue paper on sale after Christmas at craft stores and drug stores. Now I go to the dollar store, they have a pack of about 30 very colorful sheets of wrapping tissue for a dollar (duh). As for the size, you won’t easily find the size sheets called for on the web site. I just have them do their best, but if this concerns you, you can scale the size of the template to match the paper.
You will need: tissue paper, glue sticks, scissors, some string (to close the top), and aluminum wire to keep the mouth open. Try to get aluminum wire, copper is much heavier and will impact their flight.
Some quick tips: They use pins to hold the tissue paper together. I just staple outside the pattern, it’s much quicker and easier. You get about two balloons per glue stick, so have plenty on hand. Good scissors really make a difference with tissue paper. When you go to launch, take a glue stick and some spare tissue paper for patching and field repairs.
(These plans were printed off the original site, the original link is dead.)
On the first page you will see part of the template layout. Do not fret, the last page has both the authors original 60″ template and my super-sized template for a 90″ hot air balloon. Yes, I made one. Yes it was awesome, although a little hard to manage.
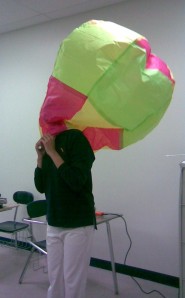
For some reason, regardless of the age of the kids, they love to catch them on their heads. There is no harm in doing this as long as you did a good job securing the aluminum wire. Have fun.

Visitor Comments