Posts Tagged ‘Electricity’
Capacitance Lab
Posted on: April 1, 2010
 Marcie and I have been chatting. She has this capacitor lab that she likes and said I can post it here.
The kids use the multimeter to measure the capacitance of some rudimentary parallel plate capacitors made from Al foil (Note: the Harbor Freight multimeters do not measure a small enough capacitance for this lab…it’s in the nF range). I adapted this lab from somewhere but I can’t remember where are this point. I have attached both the lab and the graphical analysis I make available to them. I use this with my honors level class and they pretty much teach capacitors to themselves. I try to do a lot with proportionality with them throughout the year so they can start to develop their own mathematical models (especially with straight forward things like this). Although it’s a small step, having them develop their “own” models (or at least work through to find the equation) develops fundamental science skills necessary for research and enforces the fundamental content standards of NSTA.
The capacitance lab paper is attached here, but due to WordPress limitations, the spreadsheet links to Marcie’s web page at school.
I want to do some experiments with wax paper rolling them into canisters and maybe plywood sheets of known thickness. If I do, I’ll either add on to this post or create a new post with my results.
This mini-lab worked out really well. In fact, quite of few kids surprised me by getting into building circuits. I know a lab goes well when nobody bails or gives up in frustration.
I introduced series and parallel circuits with three quick overheads. I also taught them the schematic symbols for a battery, switch, and bulb. I helped them out by drawing the schematic for the first problem. The attached document is pretty much self-explanatory, but I would suggest you have the kids read the last couple questions before they start building.
I had the kids in groups of two. Each group needed a 3v battery pack (2-D cells), two light bulbs in holders, two knife switches, and about 6 sets of alligator jumpers. You could use pre-cut wires, I had the jumpers available.
With the introduction to series and parallel circuits, the lab took the entire class period to complete.
Lemon or Lime Battery
Posted on: April 15, 2009
It’s not about being politically correct. Limes are cheaper than lemons. A bag of 5 limes was $1, lemons were $2. Since we were sticking metal in them and then throwing them away, frugality wins. Besides, I have some leftovers that may become margaritas.
Now, I ran out of time and didn’t create a lab sheet, so I had to wing this a bit. We did have a kit from Carolina that included electrodes of Fe, Cu, Al, and Zn. I decided I would have less trouble if I did the cutting into the limes. I used a plastic knife and cut two slits about 3/4″ apart, large enough for the electrodes to easily slip into the lime.
On the board I created a simple 4×4 matrix of the metals and had the students test each metal pair as electrodes. I also had them test Fe-Fe, and Cu-Cu, etc. That meant they had to share electrodes to get the similar pairs. They found that only dissimilar metals created a voltage and the voltages were not all equal. Cu-Zn created the largest, at around .9 volts.
Next, I had them pull out change from their pockets and try the coins as electrodes. I also had some galvanized screws (zinc coating) for them to use.
Once they had a feel for what makes their battery work, I gave them each an LED for them to try to light up. A single battery didn’t have enough voltage, so they had to partner up with another group and figure out (with some guidance in the form of a drawing on the board) how to wire the batteries in series. With two, they could get a red LED to light up. We had to turn out the lights to make it visible. The green LEDs seem to require more power and didn’t light up with the same batteries. They also wired three together and made the light even brighter.
Yes, I needed more organization. Tomorrow we do series and parallel circuits using switches and light bulbs. It’s fourth quarter and I feel like I’m out of energy myself.
Building an Electric Motor
Posted on: June 2, 2008
I do this more as an activity than anything else. I end up trying to cover electricity and magnetism in about two weeks, not anywhere near what is needed. I try to make the material relevant because it’s above most of the students in my conceptual physics classes. This is one of those activities where they amaze themselves.
I got the plans for an electric motor design from the book “Teaching Physics with Toys” by Taylor, Poth, & Portman. This book is really geared towards K-9, but I figure that if I find the activity cool, then why wouldn’t an 11th or 12th grader. I have the 1995 edition, they have a new edition that I haven’t seen. I don’t even know if this activity is in the new edition.
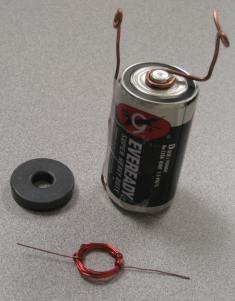
You can find similar activities on the web. (Build It: Electric Motor), but I like the design in the book better. Basically, you need a D cell, a doughnut magnet (available at Radio Shack), some bare heavy wire, like 14 or 16 gauge, some transformer or magnet wire (22-28 gauge), and a piece of sandpaper.
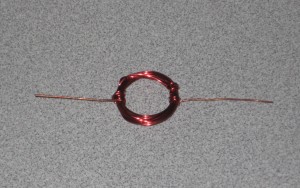
You take an arms length of the transformer wire, leave about 2 inches and wrap the rest around a dowel 5/8″ dowel or a white board marker, then leave another 2 inches at the other side.
As you may be able to see from the picture to the left, the leads are wrapped around the coil to tie it all together. It is important to try to balance the coil so that the leads are along the centerline of the loop. Next, sand the ends of the magnet wire so that the red coating is gone and you can see bare copper.
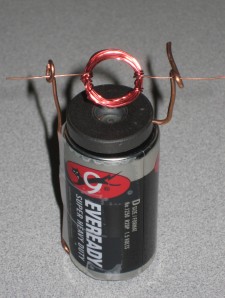
The magnet goes on top of the battery and will hold the top lead in place. You bring the negative voltage up with a bare copper wire, we use tape to hold the negative lead in place. Make a loop at the top of each with a pair of plyers. Try to make the loops on top at the same height so the motor doesn’t slide sideways.
To start the motor, just put it all together. You usually have to remove the positive lead to fit the winding coil into the loops. Put the leads back on and pop the magnet in place. If its really well made, the motor will begin spinning on its own. That rarely happens. Just give it a light spin. You will need to play with the leads to get them centered, but then when you get it right, it can run for hours.


Visitor Comments